More and more people are realising the benefit of having an alternate heat source in their homes. Sadly, as the numbers of people choosing to use wood burning or multi-fuel stoves increase so does the legislation. Making people buy certain stoves or stick to certain types of fuel that limit the carbons emitted in the smoke, has increased recently to areas far beyond the cities that were governed by the Clean Air Act and its descendants. This legislation is creeping up on both sides of the Atlantic. In the UK, you can get information on smokeless zones and the Clean Air Act on your local council websites. Generally, the nearer a city you are the more likely the zoning rules will affect you.
In the United States, the regulations vary enormously not only state by state but within individual states. Generally speaking, as in the UK, the nearer a city you are the more likely you are to be affected by the regulations regarding solid fuel fires and wood burners. Most, if not all cities are smoke-free zones. A good place to start is the EPA ordinances and regulations page which will point you in the right direction.
Okay, moving on, I’m not even considering the style of the wood stove. The aesthetics are much less important at the planning stage than whether it has a bit of chrome on it that will match your internal door handles. Having owned half a dozen different stoves trust me when I tell you it’s best to find out what your heating requirements are and then worry about style. There is no point at all in having a pretty burner with crap heat output.
The heat output of the stove is the most critical thing, it’s what makes sure you stay warm if there is no other heat source. this is easily worked out. As an example to keep a room at 21°C when it is 0°C outside you will need 1 kW of heat for every 14 cubic metres of space. to work out how many cubic metres of space you have to multiply the height of the room, by the width of the room by the length of the room and then divide that by 14. An example:
Your room height is 2.5m
Your room length is 7m
Your room width is 4m
2.5 x 7 x 4 = 70 cubic metres of space. 70 divided by 14 = 5. Therefore, you would need a minimum of a 5kW output stove.
Be warned, massive picture windows and single skin/wood walls can significantly increase heat loss, and therefore your 5kW burner may not keep the room as warm as you would like.
Personally, I always go for the highest heat output available, even though my home is double skinned brick and well insulated. I choose to do this so that there is enough heat coming off the burners to heat the whole of the downstairs and to take the chill off the upstairs if there is no other form of heating available.
The two burners we have at the moment are Stovax Stockton’s, a Stockton 4 and it’s big brother a Stockton 5. These are both in the lounge, the previous owner knocked two rooms into one. These give a combined heat output of 9kW in a room that technically only needs 3.6kW of output. The one occasion that both were alight at the same time we literally had to open the windows to let some heat escape, we could barely breathe. Upstairs was pleasantly warm as well but to be fair it was just above freezing outside and as I said the house is very well insulated.
For those readers in the UK Stovax are British made and all replacement parts are readily available. You will pay more than you would for the Chinese imports on Amazon and Ebay but in my opinion, they are worth it. Another good UK make is Villager, I’ve had a couple of those and they worked very well.
The next thing to consider is what you want to burn in it. Mine are multi-fuel and will happily burn through wood, smokeless fuel, anthracite, peat and eco logs without hesitation or damage to the stove. The main difference between a multi-fuel and a wood burning stove is the grate. A wood burner tends to be roomier inside, you burn the wood directly on the base of the stove. burn high-quality anthracite directly on the base and within a couple of years, the base of the stove will be thin and brittle from the intense heat the coal produces. Multi-fuel stoves have an internal grate a couple of inches above the base of the stove to protect the base from the direct heat of the coal.
The grate serves another purpose, coal burns best with air coming up from below, wood burns best with air coming in above the base of the fire because wood burns best on about an inch deep bed of ash whereas coal dislikes ash under it. Having a coal fire on a bed of ash will lead to a good deal of semi-burnt ‘clinker’ left in the grate. A decent multi-fuel stove will have multiple adjustable air vents so you can tailor the air intake to the fuel you are burning.
In this day and age of clean everything, many people have frowned at my decision to buy peat and anthracite. The reasons behind it are simple. Having a variety of materials I can safely and fully burn in my stove gives me the chance to purchase what is cheap at the time. We burn wood exclusively at the moment, but my stock of high-quality anthracite, non-smokeless coal, is building rather nicely because the suppliers want it off their hands and are practically giving it away. I live in an area where there are no restrictions on the fuel I burn. In a SHTF situation, there will be no restrictions on what any of us burns so do keep your options open regarding the stockpiling of solid fuel. Obviously depending on where you live smoke production may be an issue so anthracite may not be for you, but here on the island, most properties have burners or open fires so it’s not so much of an issue.
So, you have worked out your heat output and you have decided on either multi-fuel or wood only, what else?
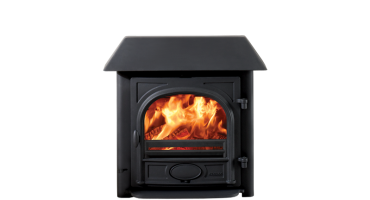
Do you want a convector on the top of your stove? A convector is the kind of hood/roof thing that you see on some stoves. It traps heat and forces it back down into the room. I opted not to have these for three reasons:
- If your chimney is well sealed above the stove then you don’t need one.
- It reduces the space on top of the stove so if push came to shove and I needed to cook on the top of the stove my surface area would be reduced, and with my small stoves I don’t have much to start with.
- I really don’t like the look of them.
Here’s one I spotted earlier.
Next, Chimneys. You may well need a flue liner. Even if you have had an open fire for years the chimney will not have been exposed to the intense heat thrown off by a wood or multi-fuel stove. Clay brick chimneys are liable to eventually crumble and get partially blocked forcing fumes back into your home. Soot is more likely to lodge in uneven and crumbling brick and this massively increases the chances of a chimney fire.
You also need to consider the hearth and the material that the stove will stand on. A lump of cast iron gets incredibly hot when the burner is in use, obviously, the floor and hearth need to be solid and fireproof. If you are doing this yourself remember to leave a very small gap between the material the burner stands on and the hearth to allow for expansion of the stone. Not having an expansion gap means your hearth is more likely to crack. Paving slabs, riven stone or any other similar material are suitable. Mine is black polished granite, but that’s just my taste…and it looks nice with my carpet. We decided on a wider hearth to make the carpet less likely to get damaged or dirty, all’s well so far.
On the technical side, that’s about it really. Just time for a few hints and tips for those that decide to take the plunge:
- Get to know your stove. Read the instruction manual so that you know which air vent controls what. It will save you a great deal of fuel. Learn from my ‘I know how to do it’ mistakes. We can now adjust ours so that there are still embers in the morning, throw in a couple of sticks and off it goes again.
- Stoves are temperamental. Our five lights on a single match for Stuart but requires an entire box from me.
- If you have trouble lighting your stove on a daily basis you are possibly not getting enough moving air into it. As an example, the legally required air vent in my floor is covered with thick carpet and even thicker underlay. Open the lounge door during the initial light up and away they go.
- Always fit a carbon monoxide monitor in the room. You won’t smell it, see it, hear it or taste it, but carbon monoxide is a killer.
- If you go for a multi-fuel never burn wood and coal at the same time. Even kiln dried wood has some moisture in it. It releases that moisture when it burns. Coal releases sulfur. Add the two together and you get sulphuric acid which will eat through anything it touches, the bricks in the chimney, the flue liner and the inside of your stove.
- Never burn overly damp wood. it soots up the chimney and leads to fires.
- Try not to burn soft resinous wood all the time, the resins which are highly flammable build up in the flue and lead to fires.
- Open all the vents and burn a really hot fire at least once a week when you are using the stove a lot. This burns off the deposits both in the stove and in the flue, it also cleans the door glass of sooty deposits.
- Remember that an open fire burns at about 30% efficiency. A stove with the door open at about 35% efficiency and a stove with the door closed at about 85% efficiency. It might look all romantic with the door open, but you’ll never get the heat output you want unless you close it.
Well there you go, the Lizzie Bennett stove guide. I hope at least some of this has been useful.
Take care
Liz
Resources:
The Prepper’s Blueprint: The Step-By-Step Guide To Help You Through Any Disaster
This article was originally published at Ready Nutrition™ on February 10th, 2015