
 Good morning dear, How are you today? I am very surprised you have asked me for advice on cooking meat. With you writing cookery books and doing all that canning stuff I was most surprised. Well, I’d better get on with it then if that’s what you want.
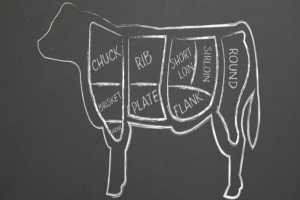
With meat, the cheaper cuts are usually the toughest and unless you cook them properly then you will end up with something that’s good for mending a hole in your shoe but not good to serve with nice fresh vegetables and crispy teddies. (Ed note: Teddies are Devon-speak for potatoes).
The tougher cuts usually come from the part of the animal that does most of the work, the thighs, for example. Most animals have huge muscles in their rumps and this can also lead to tough meat if it is incorrectly cooked..though I am partial to rump steak on occasions.
Tough cuts need to be cooked long, slow and moist. Done right it will result in some of the tastiest meat you have ever had on your plate.
Stew and casserole are the things that come into most people’s heads when you mention moist cooking, but even these can be cooked too quickly and result in tough little bits of meat mixed with you beautiful vegetables.
Braising is my favourite method of cooking cheap cuts. The meat is put in a huge enamel roaster and enough cold water to come up the side of the meat a good couple of inches. That’s it, nothing else, no seasoning of any kind, nothing. The lid is put on and the whole thing goes into a cold oven. It’s important that the heat builds up slowly so as not to cause the meat to contract, to shrink too quickly because that’s what makes it tough.
Every hour the meat should be turned so that all of it spends part of the cooking time in the water. The water will begin to mix with the juices released from the meat and this adds to the flavour.
When the meat is cooked, a skewer should allow the release of just clear juices, let it rest before attempting to carve it. Letting it rest allows the juices that have bubbled up through the meat to slowly sink back down making the whole joint tender and juicy without a hint of dryness. The water and juices you have left should be allowed to cool. The fat will have risen to the top and will be easy to remove from the liquid. It is excellent fat to reuse, we save ours in a small plastic tub in the freezer. The liquid forms the base of the gravy to serve with your meal.
Cheap cuts of lamb, such as the breast and shoulder cuts need to be treated a little differently. These cuts are very fatty, unpalatabley so if you cook them incorrectly. They still need a long time in the oven but the method is a little different.
The same tin as was used for beef and pork will be fine. Ours is a black enamelled roaster with a lid.
Put the lamb into the tin and just put a couple of spoons of cold water over it, unlike the beef and pork the fat we are going to get out of the lamb will slow roast it. The water is to create a little steam and keep the meat moist until the fat starts to melt out of the meat.
In the oven it goes. After an hour and a half turn the meat so it is skin down and an hour later turn it skin up again. Don’t drain off the fat at this point.
When the skewer test shows just clear juices drain the fat out of the tin, leave the lid off the roaster and put the lamb back in the oven on high heat for 10 minutes. This makes the skin crisp up a little and encourages the remaining fat out of the meat. Drain this fat also, put the lid back on and leave it to rest for at least 20 minutes before carving.
The juices are tasty but far too fatty to use as the base for gravy. Add just a spoon or so to the gravy to give it a little boost and a nice gloss.
With a cheap cut of lamb such as shoulder costing around £7-£9 a pound against a leaner cut at £12-£15 per pound it makes sense to learn how to cook the cheaper cuts properly.
A chunk of fore rib beef, like the one we had last month which provided a modest portion each for eight people came in at just under £40. The same sized joint but from the shin or chuck area would have cost around half that, the portions would have been far bigger and there would have been enough left over for a couple of casseroles for Edith and me. In case you’re wondering why we bought the silverside…we didn’t, Paul and Delores provided the meat. I nearly passed out when they told me how much it was.
Well, there you have it, the Granny guide to cooking cheap meat cuts. I hope it’s of some use Tess.
Thank you for asking about Edith, she’s doing fine, they are going to do the hip replacement tomorrow all being well. She will be coming home on Monday if everything goes to plan so I may not be around as much next week as she will need lots of love and fuss when she comes home.
The boys are still popping in morning and night which is starting to annoy me a bit. They mean well but for goodness sake I can look after myself. They say:
“Oh yeah, right, nana said that and then fell over and bust her hip.”
Love to all of you,
regards,
Maud
Resources:
The Pantry Primer: How to Build a One Year Food Supply in Three Months
The Prepper’s Blueprint: The Step-By-Step Guide To Help You Through Any Disaster
This article was originally published at Ready Nutrition™ on February 11th, 2015


Great article! I wish I had a grandmother like her.
so interesting!! she sounds just like my gram – full of knowledge. this looks to be an interesting series.