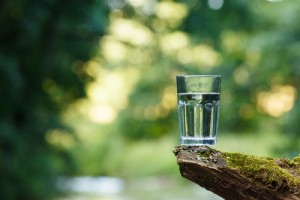
 [1]Water is the foundation of life, and as such, water preparedness is one of the most important aspects of being prepared. That said, many are not prepared for even 1 day of water rations. Moreover, there are many who feel that storing water [2] is a waste of time; after all, they can simply use tap water or step outside and use the water left over from storms and floods.
What they do not realize is that following a severe storm, hurricane or tornado, water is contaminated and should not be used for drinking. Flood waters can be contaminated with oil, gasoline, or raw sewage which can infest city water sources and cause a number of medical issues. If you don’t have a filtration system [3] to ensure potable and clean drinking water, you may want to consider have supplies on hand to make your own filtration systems.
In The Prepper’s Blueprint [4], it was addressed following a short term disaster, hospital visits and admissions increased from common diarrheal diseases, acute respiratory infections, dermatitis, and other causes. These type of medical issues are due to those coming in direct contact with contaminated flood waters. These contamination factors will cause irritation to skin and a host of other medical issues. If ingested, this tainted water can cause a host of medical related issues including but not limited to:
- Protozoan cysts (Cryptosporidium parvum, Giardia lamblia)
- Parasitic (Guinea worm, schistosomiasis, amebiasis, cryptosporidiosis (Crypto), and giardiasis)
- Bacterial (Escherichia coli, or E. coli, Salmonella, Campylobacter jejuni, Yersinia entercolitica, Leptospira interrogans and many others)
- Viral infections (hepatitis A, rotavirus, enterovirus, norovirus, Norwalk virus)
Learn the Valuable Skill of Purifying Water
The best way to ensure you have clean water for drinking is to boil it or use chemicals to disinfect the water. That said, there are times when we may not have our normal water treatment equipment around and will need to improvise. To avoid water-related illnesses, it is imperative to learn how to filter your water using materials available to you. Here are three ways of purifying water for drinking. These are also great projects to do with children to teach them this valuable skill.
1. Homemade Water Filter
When you begin to filter water from lakes, rivers and groundwater, there are 4 steps to keep in mind:
1. Coagulation: removes dirt, metals and other particles suspended in water. Chemicals like Alum are added to the water that form sticky particles called “floc” which attract the dirt particles.
2. Sedimentation: the combined weight of the sediment and chemicals stuck together become heavy and sink to the bottom.
3. Filtration: smaller particles are removed as water passes through a series of filters (sand, gravel, charcoal)
4. Disinfection: to kill bacteria or microorganisms found in the water, a small amount of chlorine is added.
Materials You Will Need:
- 1-liter soda bottles cut in half
- Napkins, cheesecloth or paper towels
- *Gravel
- *Sand
- Activated Filter Carbon (available at pet stores)
- Large water container for dirty water (pitchers or gallon jugs)
- Dirty water (made by adding dirt, twigs, leaves, etc., to water)
- Large waste container (plastic container, thick garbage bag, etc.)
- *Potable Aqua Chlorine Dioxide, water purification drops or tablets
- 2 clean pitchers for filtered water
- Cut 1-liter soda bottle in half and put top of soda bottle upside-down (similar to a funnel) inside the bottom half. The top half will build the filter, the bottom half will hold the filtered water.
- Add napkin, cheesecloth or paper towel at the neck of the inverted bottle.
- Add filtration materials in this sequence:
1 inch of charcoal
2 inches sand
1 inch gravel
2 inches sand
1 inch gravel
- Add unfiltered water and allow water to seep through the filter.
- For added measure, it is recommended to chemically treat filtered water to kill off any pathogens that were not filtered.
2. Homemade Water Distiller
Materials You Will Need:
- Dish-washing soap
- Stove
- Drill and drill bit
- Stainless steel feed-through fitting that has a barbed end and an inner diameter of 3/8-inches
- A 3-ft. long plastic hose that has an inner diameter that matches the stainless steel feed-through fitting
- Large glass jug
- A one-gallon metal pot with a tight lid
- Begin making your homemade water distiller by using the drill to make a hole in the metal pot’s lid. Once the hole has been successfully drilled, insert the stainless steel feed-through fitting through it, taking care to keep the fitting’s barbed end outside of the metal pot.
- Give the metal pot a vigorous washing with warm water and dish-washing soap. Be sure to thoroughly wash the pot’s lid, the glass jug and the plastic hose as well. Once your materials have been sufficiently cleaned, give them all ample time to air dry before proceeding any further.
- Fill the metal pot exactly three-fourths of the way up with the water you wish to distill, then place the partially filled pot on the stove and heat it up to about 200 degrees Fahrenheit. After steam has escaped from the stainless steel feed-through fitting for about five minutes, you will be ready to continue with the next step.
- You’re almost finished with your homemade water distiller. You’ll now need to slowly attach one end of the plastic hose to the stainless steel feed-through fitting, thus venting away any remaining contaminants and preventing them from being condensed into the freshly distilled water. Place the other end of the plastic hose into your jug. Steam that is being condensed will slowly drip into the glass jug in the form of pure water. After the dripping slows down considerably or stops completely, take the metal pot off the stove, after which it will require at least half an hour of cooling-down time before it and the plastic hose can be cleaned.
3. Solar Powered Water Distiller
Similar to this construction [5], you need few materials to make this.
Materials You Will Need:
- 2 liter soda bottle
- utility knife
- lighter
- Black rag
- Cut an empty bottle in half using the utility knife.
- Using the top half of the bottle (the part with the lid), fold the bottom edges of cut bottle inward making a 1″ or 2″ lip back into the inside of the bottle (this is the trough). If needed, use the lighter to heat to help the bottle in order to easily bend back in.
- Thoroughly soak a black rag with the dirty water and set it inside the plastic bottle in full sun for 4 hours or more. The water will evaporate and condense on the inside sides of the bottle and find its way down into the trough.
- When you notice enough water has collected in the trough, carefully remove the bottle from the nasty black rag and flip it over quickly. The water now flows the other way and ends up in the cap. Carefully remove the cap and drink the water.
Portions of this information have been sourced from The Prepper’s Blueprint [6].