Firstly, you don’t have to buy a Cannondale for a grand in order to have a decent bike. I highly recommend your local pawn shops. Many times that thousand-dollar Cannondale can be found for one half or even one third of the original price. What you want to concentrate on is a good, sturdy frame that can take a beating off-road and do some good in a cross-country scenario.
There are a bunch of good brands out there…BMX, Schwinn…the types are endless. Mine is a bit of a “hodgepodge,” built out of a BMX frame, with heavy-duty Goodyear tires, and a chain-drive by Shimano with some brakes taken from a Huffy. I mounted a decent platform on the back that has supports to tie in to the axle on the rear wheels without any interference. The platform itself is tubular steel and semi-triangular but long and narrow in shape.
I modified the seat to put on a really wide, well-foamed one with huge springs for a really comfortable ride. Also, these bicycle lights? No need. Take two pipe clamps, that run 1 ½ – 2 inches. Place one on the front handlebars to hold the other perpendicular, and then stick a good flashlight (I prefer the short stubby ones by Coast) in it. Then you can remove it as you need, and also give yourself enough light.
Subdue the bike with the color paint of your choice. I chose black. Get yourself a decent fanny pack or a tool bag for it, and carry two (2) inner tubes, as well as some “slime” to patch a single tube for a temporary fix. You also don’t need an entire toolbox. Measure and fit a ratchet set and ratchet heads to the nuts and bolts of your bike, as well as an Allen wrench set, spoke wrench, pair of pliers, and maybe a small hammer. Also, a small can of WD-40 will be worth its weight.
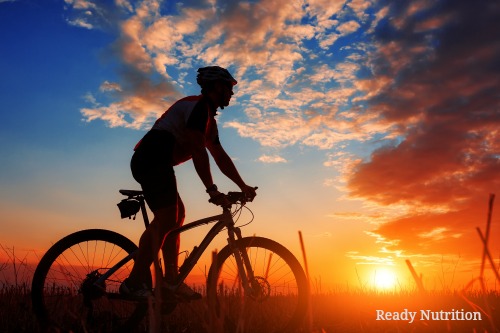
A lot of people prefer Camelbacks, but I prefer the standard plastic 20-ounce water bottle in the holder attached to the inside base of my frame. Also, on the top frame support I have a Schwinn collapsible air pump, a must-have in my opinion. My cable and combination lock is wrapped around the seat support for when I need to lock it up. I also use a helmet…a good one, usable for light tactical maneuvers such as CQB and room-clearing if I’m not on the bike.
What I do with mine is stow it in the back of my truck, which is covered. EMP? No problem, I’ll shove the vehicle off the road (if it’s no longer functioning), and grab my gear and take the bike out. Matter of fact, I use it as a normal course of things. When you’re out and about (and you have the time), you can park your vehicle in a central location and save gas while you exercise, by using the bicycle for your travels. Anything that helps you further develop your physical fitness is an asset.
You really want the one that can go off-road. Now regarding the platform that I have (and strongly recommend), the importance is due to your “Go” bag (bug-out bag) that you can rest on and also secure to the platform with bungee cords or tie-straps. This goes a long way to allowing you to take the stress of the weight off of you and better balance you as you get out of dodge on the bike. Now comes another big thing that you need to follow after: you must practice.
Yes, having the bike and the gear is not a substitute for being able to employ it. The best thing is to give yourself time on it, both on a paved environment and off-road. You need to plot out routes for yourself in between your home and your work locations in order to find all obstacles and optimal courses to follow. You need to know the routes and run them with the bike, and with your gear as a final test. You also would benefit from “requalifying” runs with your gear to find out your times and how to adjust your weight loads accordingly.
Then there’s the night. Ohh, the EMP struck at night and not the day? No fair! Tough “S” in that regard: if you haven’t prepared it’s on you. Here’s where your daytime work pays off.
The same obstacles that exist in the daytime exist at night: there’s just no light or minimal light to see them.
But if you’ve practiced, take it slow at night the first time, and you’ll see everything click into place…the same bumps, depressions, and patches of thorns are there at night. The same railroad tracks, and bends in the road that go right off of a bluff are there. You’ll find your confidence will be high after you’ve mastered running your route at night and coming through it with no defects.
Practice. This is how it’s done. And there’s more: practice in inclement weather, and in a strong wind…and then throw in the night factor. I’m not suggesting anything that I haven’t already done…and do regularly in the normal course of my physical training…training that never stops for me because I don’t allow it to stop.
You can do it! Get yourself a good bike, or build one, and put it to use. It’ll pay off. Maintain it, and change those tires periodically. Buy a set of good spares…the tires themselves…and all of your equipment. Stockpile it, but don’t let it just sit there. The trick is not so much to have the best equipment.
The art is to know your equipment so well that it’s an extension of yourself.
So, the bike can get you through tough times, as well as providing you with exercise and enjoyment prior to the SHTF. You’ll find it a challenge, but that’s what makes it worth it in the long run. Happy cycling, and keep fighting that good fight! JJ out!
All is good for those who are young and energetic. My husband is unable to ride a bike due to an injury from the military. His right hip was dislocated after his car was hit head-on. Both of us have balance issues. I am in my mid-60’s and he is in his late 60’s.