Did you know that February is the month set aside for organizing your kitchen? I didn’t know that until recently, but it makes perfect sense. In northern climates it is usually too cold to venture outside, and in the south, it is usually too rainy to venture outside; somehow to busy moms that translates to it’s time to organize the kitchen. I normally start with decluttering hot spots that have snuck in unnoticed – you know the kid’s activity area, the place your husband slaps the mail down – even though you have a bin for it, and then the pile of things you set aside to take care of in your spare time that you haven’t been able to get to yet. (That’s right, even I am guilty of generating some clutter. Ugh!). As I said, I would normally start there, but over the weekend I found another area that was screaming for my attention -the food pantry. It has been over run. Part of the problem is that I am the only one in my household that follows the organizational scheme. (You probably sing the same sad song, right?) That aside, I realized that the food I have been purchasing has outgrown its assigned bin. I have two areas in my home dedicated to grocery storage – the pantry and a spare closet, and both are overflowing. Whoopsie!
Below are five tips that can help you organize your kitchen pantry.
- Assess the clutter. The only way to know what you really have in your pantry is to dig in. I took out each of my bins and assessed what was there, and then I decided whether to keep items, donate items, or toss them. I looked for the following:
- Food and spices that had expired. (Tossed)
- Food items that were at risk for being spoiled, e.g., boxes left open. (Assessed; either bagged and re-filed or tossed.)
- Food my family wasn’t consuming because they didn’t like it. (Donated)
- Food my family wasn’t consuming, but could be used in freezer meals. (Noted; re-filed)
- Food that was placed in the wrong bin. (Re-filed)
Tip: While everything is out of the pantry, get a head start on your spring cleaning. Use the opportunity to vacuum up debris and wipe down the shelves.
Caution: If you ignore the cleanup step, little bugs will take it as an open invitation to move in and set up camp. Once those unwelcomed house guests settle it, it is difficult to get them to leave.
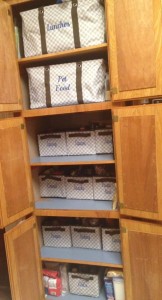
- Label the bins. Last Spring I custom-labeled my bins. It has saved me so much time and guess work trying to figure out where items should go. In addition, I find it aesthetically pleasing to look at. You don’t have to go to the extreme I did, but you do need to label with something. Consider using chalkboard stick-ons (you can use the container for something else later), a marker, a label maker, picture frames, etc. Feel free to get crafty with it, just be sure to do it. Here is a picture of what I did, but I encourage you to come up with a labeling system that works for you.
Note: The open flour has been placed in a sealed, label container. See item 4.
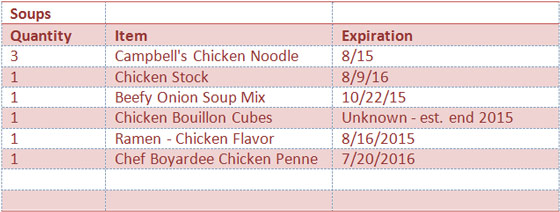
- Make an Inventory. This is something I have just started doing, and I am loving it. Based on your categories, make a list that captures what is in your pantry. I broke mine down by the labels on my bins, and then I taped a hardcopy to the inside of my pantry door. I left a couple of blank spaces to add items by hand if I don’t have enough time to access my computer file. By having an inventory, you always know what you have on hand and what needs to be added to the grocery list.
Tip: If an item filed in your labeled bin is a staple for your family, plan to have two on hand at all times. From my list above, I definitely need to purchase more chicken stock.
Tip: When putting your items back in your bin, follow the Last In, Last Out rule. Put your oldest jarred and canned items in up front and your newly purchased items in back. This will help cut down on expired items that escape your attention.
- Put the items back in. When you place your items back into your pantry consider grouping items that should be together near each other. For example, my top row is dedicated to spices (sweet and savory) and sauces. Another row is grouped by soups, baking items, and canned items. When I cook, these items are often together.
- Scavenge for additional storage, if necessary. At the end of organizing, you may find that you need more food storage. Search your home for additional spots such as a closet. Or, use some of these space-saving ideas for the kitchen.
Tip: When locating additional food storage areas in your home, look for cool and dry areas. If you choose an area that has dramatic temperature spikes, such as an attic, your food can spoil.
Reorganizing my pantry led me to the following conclusion: I need more pantry space, but I never would have realized it without sorting through everything. I encourage you sometime during February to set aside an hour or two to organize your pantry. Don’t be afraid; just roll up your sleeves and dig in.


