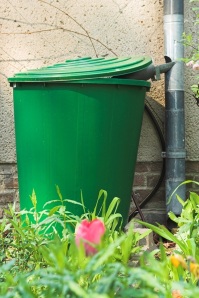
Environmentally friendly rain barrels can be made from pretty much any 55 – 60 gallon container, but one of the most readily available is a basic trash can. Other options include reusing old plastic pickle barrels, soda barrels or any barrel that once carried food-grade materials in it.
A simple trash can works for rain barrel water collection
By making sure the previous contents of your recycled barrel were food-grade, you can feel more secure about using the water collected in it to feed your vegetable garden or wash your dog. Barrels that contained harsh chemicals are often hard to scrub out entirely and could still contain traces of toxins.
The basic rain barrel
Regardless of what barrel type you choose, your basic rain barrel consists of four parts:
- The barrel to hold the collected rain water
- A screened inlet that lets in rain water but keeps out leaves, mosquitoes and small animals
- An outlet near the bottom that can be opened and closed
- An overflow near the top, in case your barrel reaches capacity
Equipment
DIY rain barrels can be as elaborate or simple as you want them to be. This project gives you the basic model but it can easily be added on to and expanded to fit your rain gardening needs. To build a trash can rain barrel, you’ll need:
- A 55 – 60 gallon trash can (lid optional, but recommended)
- Window screen (instead of purchasing new, consider cutting it out of an old screen window or door)
- 1 garden hose, ½” diameter (standard)
- ½” boiler drain (spigot)
- 1, ½” conduit lock nut
- 2, ½” flat metal washers
- 2, ½” rubber washers
- Grease pencil or marker
- staple gun
- pliers
- utility knife
- scissors
- screwdriver
- 2 – 4 old cinder blocks or gravel
- caulking gun and silicone (optional)
Instructions
- Creating the outlet: This part is a lot easier if you have a ½” hole-boring drill bit for an electric drill, but if you’re doing this project by hand, draw a ½” cross hatch a couple inches from the bottom of the barrel and use it to cut out a ½” diameter circle through which you can thread your boiler drain. When cutting, a little less is better than a little more. If the opening is too big, even the rubber washers can’t stop a leak. Be sure to thread a flat metal washer and then a rubber washer on the boiler drain before threading the drain through the opening.
- At this point, if you are using silicone, coat the boiler drain threads and opening before threading the boiler drain into place.
- Seal the boiler drain on the interior with the rubber washer first, then the flat metal washer and finally the lock nut. The rubber washers should be directly against the trash can on both sides. Use the pliers to tighten. The hose will attach to the boiler drain to direct your rainwater for use.
- Attach the screen: Take your screen and drape it over the top of the uncovered trash can. Using the staple gun, staple the screen in place, pulling it tight as you go to keep it from sagging. Use the scissors to cut off the excess and to give it a finished look.
- Prep the lid: Even though you don’t necessarily need a lid for your rain barrel – the screen will keep out larger debris and most insects – a lid will keep yard critters from potentially falling in and will give the finished product a cleaner look. If you’re using the lid, cut out a square opening large enough to accommodate the downpour spout on your gutter.
- Cut an overflow: A few inches below the top of the barrel, cut a hole roughly 1″ in diameter for excess water to escape. If you want to direct the water away from the house, follow the same instructions for installing the first boiler drain except instead of a boiler drain spigot, use a ½” PVC male adapter so that you can attach a hose directly to the overflow outlet and run the hose away from your house.
- Prep your gutter: Locate your gutter down spout and measure enough room to fit not only your rain barrel, but the barrel stand (gravel or cinder blocks – see below) and the extra length of gutter spout you’ll need to attach to the end to direct the water into the rain barrel. Cut the down spout using your utility knife and attach the gutter spout.
- Place your rain barrel: Before putting the rain barrel under the gutter spout, prep the ground underneath either with a pile of gravel or 2 – 4 leveled cinder blocks. This will ensure that your rain barrel stays in place even in the heaviest downpour and doesn’t retain water around its base. Once in place, adjust the rain barrel so that the gutter spout flows through the lid opening and you’re done!
Rain barrel water can be used for pretty much any ‘gray water’ purpose, from watering the garden to washing the car, filling bird baths and keeping your compost pile damp.
What do you use your rain barrel water for? Where have you found suitable containers for creating rain barrels?
About the author: Garret Stembridge is a member of the Internet marketing team at Extra Space Storage, a leading provider of self storage facilities. Garret often writes about sustainable practices for the home and for businesses. Their East Tampa, Florida self storage facility has been retrofitted to reduce energy consumption, and can be found here.

