 We’re going to do an introduction on making pemmican, a survival and backpacking food that can be used all year round as well as prepared anytime. It is a lot simpler to make than most people realize, and does not take up a whole lot of resources or too much time. Pemmican can be stored for long periods of time and can give you a ready source of protein when you don’t have the time to cook up a large meal. Sure, you can buy a whole pallet of it at a time from Costco, but when your supply runs out, how do you replenish it after the SHTF? Well, this piece gives you the basics of how to do that.
Pemmican is the Original Superfood
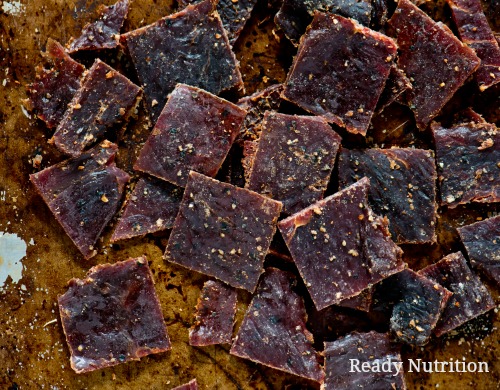
Pemmican is similar to jerky, but it isn’t: it’s a little different. It is actually the original processed meat, “invented” if you will, by the Indian tribes to provide a way to preserve the meat from their wild game. Now, as I mentioned to you in previous articles, man needs fats in his diet and vitamins as well that are not able to be furbished completely by wild game. Here is where it becomes tricky: the Indians had to supplement their meat with fish, vegetables, herbs, and fruits both wild-crafted and raised to well-round their diets. Pemmican well-rounded the Indian’s diet by adding some fats as well as some vitamins and minerals to the protein.
Pemmican is the result of drying the meat in thin strips, grinding it and pulverizing it into powder, adding liquefied fat and seasonings, and re-drying it to form the finished product. That’s it! The Indians had deer, elk, buffalo (bison), and antelope to use. Most pemmican these days is made of beef and comes in a family-friendly, happy plastic bag with food-grade desiccant. This method I’m going to give to you is bare bones to make your pemmican. Here it is:
Jeremiah’s Pemmican Recipe
What You Will Need:
- 4 cups of extra lean meat…this is about a pound/a pound and a half…pick your meat
- 4 cups of dried fruits, such as raspberries, blueberries, or even raisins
- 2 cups of fat (after rendering), or about ½ pound of weight
- Seasonings: I prefer dried onion and garlic powder, salt, pepper, etc.
- Sweeteners: You can also use some molasses or honey if you wish
The Process:
- Slice up your meat in long, thin slices (as thin as possible). One way to slice it thin is to have regular pieces of meat, and harden it in the freezer. Don’t freeze it! You just want the meat to be “sliceable”, but more “solid” than just barely-refrigerated meat or meat at room temperature. Then you can add your seasonings. Rub it in with your hands, spreading it evenly over the sliced pieces.
2. Next set that meat on the rack of your oven, and keep the temperature as low as you can go…around 135 to 150 degrees F. Permit the oven door to be gapped/cracked during the process, as this will cut down on the humidity and water building up from the drying. Do this for 12-16 hours, until your meat is dried out and akin to a potato chip…brittle, or crisped.
3. Pulverize this meat in any way that you wish (mortar and pestle, hammer, food processor…whatever works). Pulverize your dried fruits (you may have to dry them even further than when you first get them). Next comes the liquefied fat to add…first you must liquefy it. This is called “rendering,” and you can do it in a saucepan or in a crockpot, after you cut up the fat into pieces that will easily dissolve. Beef tallow is the best…you can pick this up from a butcher shop. You can use pork lard; however, I don’t recommend it because it doesn’t keep as long or as well as the beef fat.
4. All of your chopped-up beef and fruit can be placed in a large pan…such as a baking or casserole pan for the addition of the fat. Do not use the fat until it has been liquefied completely, and you’ll have to remove the solid portions of any bits floating in it…use a small sieve/strainer to scoop these pieces out by hand. For the sweeteners (such as molasses or honey) I like to take about a quarter cup and mix it into the meat prior to the addition of the liquefied fat.
5. Then carefully pour your hot rendered fat all over the meat, allowing the fat to be absorbed by your powdered mixture. You need to take your time with this step, and then smooth/pat the fat into place with your hands to further enable the even distribution of the fat into the meat. A good cook uses his or her hands. A great cook washes their hands before using them to cook!
6. When this congeals and hardens, you can cut it into strips or whatever shapes your heart desires. I personally like to use a pair of scissors (a pair I only use for food and cooking), and cut them into elongated strips about 1” in width and 6” in length. The reason I make them this size is that they’re easier to pull out and eat. So many times, with store-bought pemmican you have to rip it all to pieces just to cram it into your awaiting maw. “Not I,” said the little red hen! I want to eat leisurely and not waste effort or energy ripping my food into bite-sized pieces. You can store this best either in plastic or in wax paper (I prefer the latter) and then flatten it out, and throw it into Ziploc bags. Keep it in a cool place free of light and moisture, and it’ll be good for a long, long time.
So basically, that’s it! Simple enough, right? Now you have the information and all you need to do now is employ it! Just think: there’s still time to make yourself a batch before New Year comes about. Oh, what a delightful crowd-pleaser it will be to make up some and have everyone eat it all up right in front of your eyes! Partygoers and piranhas have one difference: both eat everything until they’re filled up, but the piranhas don’t also grab some extra to take home with them! You make up a batch of jerky and (if they haven’t eaten it all) they’ll take it! Just make sure to keep some set aside for yourself so that you can enjoy what you made. Happy New Year to all! JJ out!
Hi,
You can also use your finished pemmican as “meat” when cooking. Let’s say chili or some type of mix of beans, rice and whatever vegetables you are able to get your hands on in a SHTF scenario. For this, I personally prefer the plain pemmican that only has some non iodine salt and perhaps some dried granular garlic added to it.
Put the rinsed dried beans in water and let soak over night. Next day, pour off the soak water and rinse your now less hard and dry beans thoroughly. Put in a pot, cover with fresh water, add salt if you wish and let cook until almost tender. Add rice and let cook until the rice is nearly the right texture, add whatever vegetables or greens you have and also add your chunk of broken/cut up pemmican. Let simmer until everything has reached the right consistency and of course the pemmican is totally dissolved into the mix of rice, beans and veggies and you have a complete well rounded meal that you can feed your whole family. If you have spices, add what you want to taste. 🙂
Great idea! Thanks, Solani!
Cut the pemmican with scissors? Maybe I’m doing it wrong but mine comes out like crumbly cakes…