[Editor’s Note: When you plan on bugging out into the woods, as many preppers plan to do when Plan A and B do not go as planned, you typically walk the area in order to familiarize yourself with the surroundings. But have you planned for an emergency occurring while you are on these long hikes and walks? As Jeremiah Johnson explains, those who live close to these areas should consider adding small emergency caches along the trail in order to prevent the worst outcome possible.]

As you may have deduced, my favorite author (dealing with the outdoors) is Jack London, and in this instance, the work I wish to cite is the short story, “Love of Life.” It’s a great read: you’ll become thoroughly frustrated with the main character if you haven’t read it already. One of the items that the story holds that relates to you is that of the cache. The main character lived in spite of the fact that his trail-buddy (in this case, the guy was a rat) pillaged the cache prior to his reaching it. This is a very not-good thing; make sure your trail-buddy is truly a buddy, I highly recommend.
A Centrally Located Cache Is Your Ultimate Back-Up Plan
When you are making your way to your cache that means that your Plan A and Plan B went up in smoke. A common misconception is that a cache always has to be buried. This holds true in military operations; however, we are focusing here on survival caches that you can fashion to help you in your outdoor adventures. A survival cache is one that is not buried in the earth, but is protected to maintain its integrity for when you need it the most. In this regard, your supplies need to be protected from the elements and also shielded from view.
This piece gives you some pointers on how to do this if you’re operating in fairly familiar terrain, or on ground that you periodically cover. You can set in a few caches for yourself in an area where you “range” in your backpacking and camping excursions. The cache is just how it sounds: backup supplies for when you need them the most. One of the things you must take into consideration is theft or appropriation by someone other than yourself. Do you know of a safe area in the rocks that is not frequented by many campers or hikers? Are you familiar with safe areas that do not see much foot traffic?
Supplies Are There When You Need Them Most
You can set food and equipment as well as clothing and lifesaving supplies in these small caches that will give you an advantage should you ever become injured and where you are is untenable. For your range from your base-camp, you will have to decide just how far you will be roaming. Use a Triangular Model for your base-camp and the supporting caches. Three (3) caches per base camp should suffice. Your cache should have these at a minimum:
- Dried Food (enough for 2-3 days)
- Firestarter/matches/lighter
- Heat Source (sterno, hexamine stove)
- Fishing gear (line, hooks, lures)
- Water purification media (pills, filter)
- 1 blanket
- Rain suit
- 2 pairs of socks in Ziploc bag
- Toilet paper (use, or fire starter)
- Poncho/plastic fly (for shelter)
- Flashlight
- Extra ammo (for whatever you tote)
- Pocketknife
- Metal canteen cup
For other supply ideas for your prepper cache, check this list out.
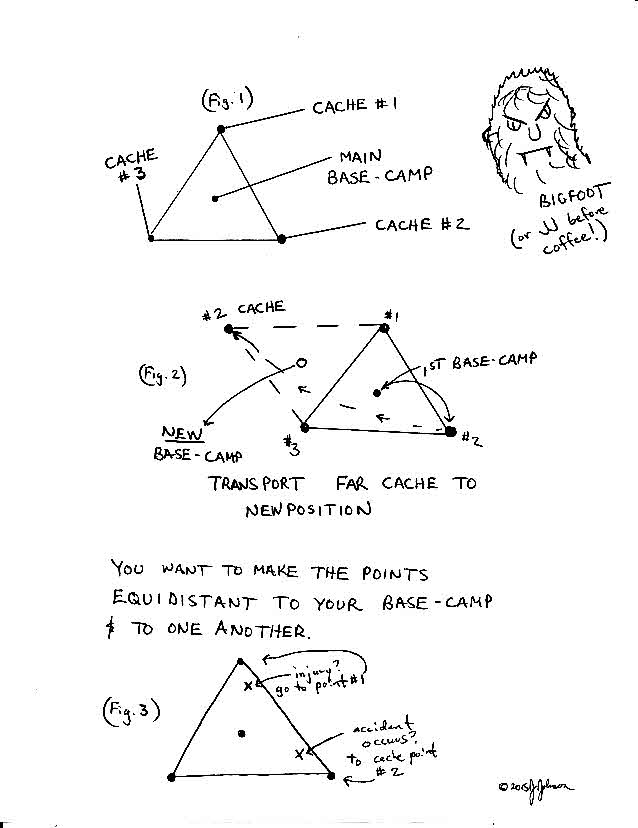
The caches can be in plastic bins, and waterproofed. When you set them in, make sure they are both concealed and camouflaged. The triangular model will suffice. (See Fig. 1)

Are you just hiking or are you hunting or maybe ice-fishing? What is your range? These are all factors you need to figure in at first, prior to taking your trip. When it comes to emplacing and there is two feet of snow on the ground, one effective method is to take your bins in by toboggan and snowshoe all of them to the points you will use. I highly recommend following JJ’s rule on these temporary caches:
Rules of 3
If you’re going to be out in the brush for 1 week or more, set in the 3 caches.
Just the one time you may need it and will be worth the effort. The reason for three: if you have a range that is, for example, five miles, you want to make sure that your cache point is closer to you than the farthest extent of your range. This means that if your base-camp is in the center of a five-mile radius, then your points (generally speaking) will be closer than a couple of miles, depending on where you’re walking when and if an accident occurs. (Refer to the diagram: see Fig. 3)
Should you decide to relocate your base-camp, the beauty of this is that you relocate the base in relation to the triangle. Centrally locate the new base camp in the new triangle, and then just take the farthest cache and re-emplace it into a new position to form one of the three points of the new triangle (See Fig. 2). Notice in the diagram how cache points # 1 and 3 stay the same? The method works, ladies and gents, I’m here to tell you.
When you are in uncharted territory (ground you haven’t ever visited: an all-new exploration), you must emplace all three of these as you go along in a new triangle. Remember, you want to use the triangle to limit your range. If you venture outside of the range, you should never go more than half of the distance (from your base camp to one of the points) away from one of your cache points. Take the time: move your base camp, and move the furthest cache point to form a new triangle. An ounce of prevention is worth a pound of cure. Hope this helps you in your planning. Always consult local laws and ordinances to find out if your cache setting is legal and doable. Have a great day, and remember to plan your work and work your plan!
JJ
