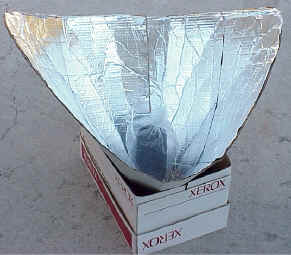
 When you think about losing access to the grid, whether short-term or long-term, one major concern is losing the ability to cook.
An open fire is not always a possibility for many reasons: limited fuel, the risk of smells attracting unwanted dinner guests (two-legged or four-legged), or no proper place in which to build a fire.
Many preppers and self-sufficiency aficionados are looking to the sun to cook their dinners. Solar ovens are reaching new heights of popularity, but with many of the devices costing more than $250, the high price puts them out of reach for many preppers.
Dr. Steven E. Jones, a professor of physics at Brigham Young University with a background in energy usage, decided a few years ago that much of the world’s population was approaching cooking and water purification inefficiently. He sought to develop a better method. “…Half of the world’s peoples must burn wood or dried dung in order to cook their food. It came as quite a shock to me, especially as I learned of the illnesses caused by breathing smoke day in and day out, and the environmental impacts of deforestation -not to mention the time spent by people (mostly women) gathering sticks and dung to cook their food. And yet, many of these billions of people live near the equator, where sunshine is abundant and free.”
Dr. Jones researched solar ovens and solar parabolic cookers and determined that there was a need for an inexpensive, effective alternative to these devices in order to make the technology available to everyone with access to the sun.
Through research and some Christmas vacation experiments with his kids, Dr. Jones developed the prototype for a solar funnel cooker made from everyday, easily accessible items. Jones and BYU patented the device “mainly to insure that no company would prevent wide distribution of the Solar Funnel Cooker”. BYU does not make any profit off of the design and offers free detailed instructions at their website.
Since the BYU prototype was developed, others have tweaked the design based on items to which they have access. Below, you will find instructions/suggestions for building your own cooker with inexpensive items, many of which you likely already possess. A cooker has three components: a funnel, a cooking vessel and a base – mix and match based on what you have available.
Here’s What You Need to Make a Solar Funnels
Method #1: Cardboard Funnel
- 2’x4’ piece of cardboard
- Aluminum foil
- 1:1 mix of white glue and water
- Fasteners to hold the funnel together (wire brads, nuts and bolts, string)
Instructions:
- Lay your piece of cardboard out flat on the ground or work surface. Cut a half circle in the bottom of the cardboard – this is the base of your funnel. Determine the size of the circle based on the diameter of your cooking vessel, whether it is a pot or a jar – the circle must go around the vessel.
- Brush your white glue over what will form the inside of your funnel, then quckly apply aluminum foil, shiny side out, over the entire surface of the interior of the funnel. Allow your glue to dry.
- Once your foil is firmly adhered, form the funnel by joining the outside edges of the cardboard into a modified cone shape, with an open angle on one side to catch the sun. You can fasten this a few different ways – you can punch holes in it and use metal brads or string, you can securely tape it with a heat-proof tape – be creative and use what you have or can easily acquire.
Method #2: Windshield Shade Funnel
- Shiny mylar-type windshield shade
- 3 squares of stick-on Velcro
- Metal cooling rack (like the kind you use for cooling baked goods)
Instructions:
- Near the bottom of short ends of the shade, apply your three pieces of Velcro to each side.
- Form a large funnel without an opening at the bottom. With this method, your cooking vessel will be on top of the funnel.
- Place your metal cooling rack on top of the sunshade funnel – this will allow the heat to rise up from the bottom and cook your food more evenly.
Here’s What You Need to Make Cooking Vessels
Method #1
- 2 quart canning jar sprayed with black matte spray paint
- Plastic bag big enough to go around the jar (like an oven cooking bag)
Or
Method #2
- Black pot with a black lid
- Glass bowl that pot fits tightly into (pot must touch at the rim of the bowl only, hot air must be trapped in between the bowl and the pot)
Or
- Black Pot with a black lid
- Plastic cooking bag big enough to go around the pot
Bases
A base will add to the stability and overall effectiveness of your solar funnel cooker. There are many options – just keep in mind your base should be resistant to heat, allow for air circulation, be big enough to support your cooking vessel securely, and be sturdy enough not to tip over with a heavy item on top of it.
- Concrete block or blocks
- Metal wastebasket
- Metal bucket
- Sturdy block of wood
What can you cook in a solar cooker?
Pretty much anything you want to. The solar cooker works best when the UV index is 7 or higher. (Sun high overhead, few clouds.)
Cooking times are approximate. Increase cooking times for partly-cloudy days, sun not overhead (e.g., wintertime) or for more than about 3 cups of food in the cooking jar.
Stirring is not necessary for most foods. Food generally will not burn in the solar cooker.
Vegetables Preparation: No need to add water if fresh. Cut into slices or “logs” to ensure uniform cooking. Corn will cook fine with or without the cob.
Cooking Time: About 1.5 hours
Cereals and Grains (Rice, wheat, barley, oats, millet, etc.)
Preparation: Mix 2 parts water to every 1 part grain. Amount may vary according to individual taste. Let soak for a few hours for faster cooking. To ensure uniform cooking, shake jar after 50 minutes. CAUTION: Jar will be hot. Use gloves or cooking pads.
Cooking Time: 1.5-2 hours
Pasta and Dehydrated Soups
Preparation: First heat water to near boiling (50-70 minutes). Then add the pasta or soup mix. Stir or shake, and cook 15 additional minutes.
Cooking Time: 65-85 minutes
Beans
Preparation: Let tough or dry beans soak overnight. Place in cooking jar with water.
Cooking Time: 2-3 hours
Eggs
Preparation: No need to add water. Note: If cooked too long, egg whites may darken, but taste remains the same.Cooking Time: 1-1.5 hours, depending on desired yolk firmness.
Meats (Chicken, beef, and fish)
Preparation: No need to add water. Longer cooking makes the meat more tender.
Cooking Time: Chicken: 1.5 hours cut up or 2.5 hours whole; Beef: 1.5 hours cut up or 2.5-3 hours for larger cuts; Fish: 1-1.5 hours
Baking
Preparation: Times vary based on amount of dough.
Cooking Times: Breads: 1-1.5 hours; Biscuits: 1-1.5 hours; Cookies: 1 hour
Roasted Nuts (Peanuts, almonds, pumpkin seed, etc.)
Preparation: Place in jar. A little vegetable oil may be added if desired.
Cooking Time: About 1.5 hours
MRE’s and prepackaged foods
Preparation: For foods in dark containers, simply place the container in the cooking bag in place of the black cooking jar.
Cooking Times: Cooking time varies with the amount of food and darkness of package.
Source: BYU Solar Cooking
Harness some free power this summer and let us know how it works for you!
Resources:
http://solarcooking.org/plans/funnel.htm
http://www.youtube.com/watch?v=3W3lbqphocY&feature=related
http://www.youtube.com/watch?v=Hnynux2eGbY&feature=related
This article was originally published at Ready Nutrition™ on August 6th, 2012



Just finished my own homemade solar oven. Thanks for all the info on cooking times. Going to print this out for sure!
Excellent article on a very important subject. There is one more reason to make and use solar stoves that you did not mention. According to the WHO, cooking with solid fuels kills around 2 million people worldwide each year. It causes many more millions of cases of pneumonia each year. Cooking with the power of the sun is a very important alternative.