
 Until the 18th century, there weren’t very many ways to store food for long periods of time. You could dehydrate produce and beef, and turn dairy into cheese, but beyond that your options were limited. And even then, the amount of time you could preserve that food was limited. Nowadays we have canning, freeze drying, food additives, vacuum sealing, and even irradiation. Obviously, many of these methods aren’t very healthy, but they have given us the ability to preserve our food for many years, and even decades.
There is only one ancient food that can stack up against modern methods of preservation, and it was known as hard tack. If you’ve ever been to a civil war reenactment, you may have seen the actors munching on this hard biscuit. However, hard tack predates the American Civil War by several thousand years. Records show that ancient Egyptian and Roman sailors had their own version of hard tack.
But the Civil War is what most people remember it from, and it was that war that proved the extreme longevity of this hardy biscuit. Much of the initial supplies fed to Union and Confederate troops were leftovers from the Mexican-American War, and so much hard tack was made during the Civil War, that it wouldn’t be completely eaten until the Spanish American War; a whole 50 years later.
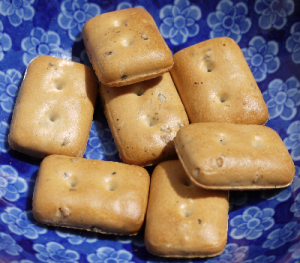
So how do you go about making this long lasting biscuit? Well there are several different recipes, but the most common one contains 4 cups of flour, 2 cups of water, and 3 teaspoons of salt. Mix it all together until you have a consistent dough, and roll it out into a square sheet. Typically the dough is about a 1/2″ thick, and is cut into 3×3 inch squares.
From here you want to use a fork or a chopstick to press 12 to 16 dimples into each square. Make them fairly deep, but not so deep that they puncture the biscuit. Afterwards you should flip the dough over and press more dimples into the back. These perforations will allow the heat to dehydrate the inner layers of the dough.
Now preheat the oven for 350-375 degrees, and place your squares on an ungreased cookie sheet. Once the oven is ready, you’ll want to cook them for 30 minutes, then flip them over and bake them for another 30 minutes.
Once they’re ready, check their consistency. If they’re soft and crumbly, then they may need to go back into the oven. They’re still edible, but they need to be really dry if you want them to last a long time. Once you’re satisfied with the results, you can let them rest and harden for a few days. You’ll know that you did a good job if the biscuits are hard enough to give you a concussion.
Fortunately you won’t be eating them in that state. Simply soak them in milk, water, or coffee for 10 or 15 minutes, and they should be sufficiently soft for eating. Or if you’d like to will the biscuits to your grandchildren, keep them in an airtight container, and they’ll stay fresh well into your twilight years.
Just make sure that you use a good quality flour for your hard tack. Bleached flour has been stripped of many of its nutrients, and modern day wheat is often genetically modified and soaked in pesticides. Find yourself some flour that is made from a higher quality wheat such as einkorn, spelt, or emmer.
And even if you prefer canned or freeze dried food for your prepping supplies, you should still try making hard tack sometime. It’s a simple but useful skill that you can use to make your flour supplies last forever.
This article was originally published at Ready Nutrition™ on November 22nd, 2014


Soaked in pesticides?
Hard tack is an example of food people will only eat if they are truly starving. I’ve seen recipes for it in many prepper sites. But I’ve NEVER read a comment from a person who willingly eats it often. You should challenge a “REAL MAN” prepper to eat some hardtack by itself. Only an extremely desperate person will willingly eat hardtack.
I must be an extremely desperate person then. I make it on a regular basis and eat it willingly. Love it. How sad am I.
Yes I have started making a paleo version with 1cup almond meal
1 cup tapioca flour
1/2 cup coconut flour
1 tsp fine salt
1cup warm water
Mix and roll out to 1/2inch
Thick cut to size and cook
At 160c for 30 minutes and then turn and cook for another 30 minutes and then let cool and dry love it
John, how long does hard tack last?
Guys, This is the modern version of the Original survival bread called Matzo. Read the Bible. Nothing new here, just a bit updated.
Cheers,
Jakamar42
John, how long does the almond flour hard tack last?