 As we turn the corner into hurricane season, many parts of the country are starting to make preparations for this type of natural disaster.
Broken windows are common occurrences with this type of storm and knowing how to protect your home is important for these preparations. Lumber is one of the many supplies to quickly disappear in preparation for disasters; therefore, having items ahead of time to be able to board up windows in a hurry will be very advantageous if you are short on preparation time.
Make sure you have everything to prepare for disasters. Here’s a checklist for supplies for short-term disasters.
Pre-cut and Prepare your Supplies Before the Storm is a Reality
Here’s where your preps come in. Do it now, and not later. Think Aesop’s “Grasshopper and Ant” fable on all things…and be prepared. You have to keep the cold and the elements out of the house.
Here’s what you’ll need:
- plastic sheeting 6 mil thickness measuring 25’ x 10’
- staple gun
- pre-cut fir strips
- galvanized nails or screws
- plywood
Plastic Sheeting – The first key is to seal, and this is with plastic. Wal-Mart has pretty thick gauge rolls of plastic sheeting, and I have found there are rolls of 6 mil thickness measuring 25’ x 10’ for sale there for about $20 per roll. You can measure all of the windows and precut pieces of this plastic for them. A good staple gun is essential for this task. Attach the staples to the outside of the window, not the inside: this will help seal out water and wind better.
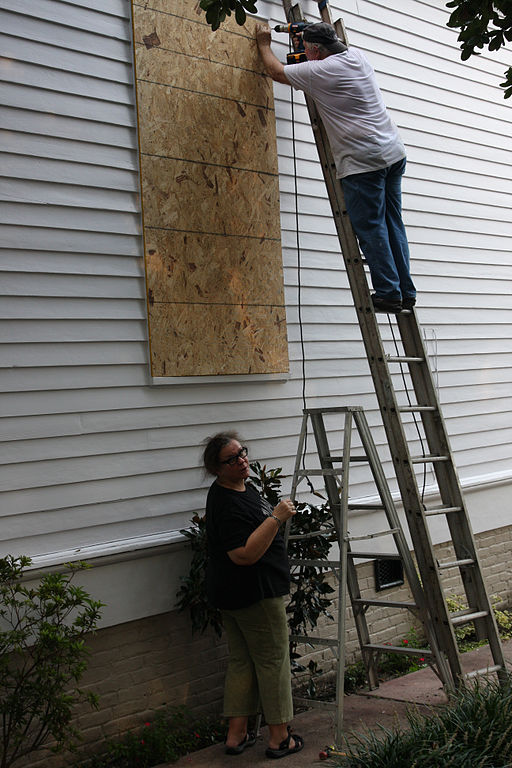
Pre-cut fir strips – You can measure and pre-cut fir strips/ 1” x 3” pieces to border the outside edges of the windows overtop of the edges of the plastic. Either nail ‘em in or screw ‘em in with drywall screws or galvanized screws…1 to 1 ½ inchers should do the trick. This will further keep the plastic intact from wind and the elements. Next comes the plywood. Much of this is going to depend on the size and height of your home. We’re addressing standard sized windows and sliding glass doors here. No doubt that some of you have some big picture windows that will take more planning and use more material, so with them you’ll have to make adjustments.
Plywood – Returning to the plywood, for the bottom floors/ground level, I recommend at least ½” pressure treated plywood. from wind and the elements. Next comes the plywood. Much of this is going to depend on the size and height of your home. We’re addressing standard sized windows and sliding glass doors here. Some of you Readers no doubt have some big picture windows that will take more planning and use more material, so with them you’ll have to make adjustments.
For the bottom floors/ground level, I recommend at least ½” pressure treated plywood. You’ll have to make braces or brackets to hold them. Either do this with pieces of 2” x 4” boards, or invest in some “L” angle irons with screw holes to help support that bottom edge. Measure the window, and cut the plywood to overlap at least 6” to 1’ on all of the sides. Sink them in with galvanized deck screws through predrilled holes in the corners and sides. You want hexagon (hex) heads on them to secure in place. All of this will take some planning on your part. It’s best to mount them on the outside, overlapping the plastic and the fir strip borders.
The reason for this is it allows for some “give” between the plywood and the newly plastic covered window. It also is better on the outside, as it is easier to smash through plywood affixed to the inside of a window/door opening than to smash through it if it’s attached to the outside of the house. Draw a diagram of your house and the location of the windows. The reasons for pre-drilling holes are that you may not have power for a corded or cordless electric drill after an EMP, or such, but you can still use your ratchet set to set in the deck bolts and secure the plywood. It also cuts down on the work you do post-window loss.
Label the diagram’s windows and doors A, B, C, etc., and then make sure that you spray paint this letter onto the corresponding piece of plywood. That way you’re all set. Don’t forget an arrow to show the side that goes upward. Store your plywood pieces either inside close to the windows they’re cut for, or pool them in a central location, stacked or lean-stacked in alphabetical order for ease of finding your pieces and matching them after the windows go.
It’s simple enough, and can run you some money, but the alternatives are elements, debris, and bugs (six and two-legged) entering through those holes. An ounce of prevention is worth a pound of cure, and this is certainly a prep that holds with that rule. Set it up now when you have the time. You can probably find some scrap plywood in good condition that you may be able to either bargain for, or that your local lumber yard will be happy to sell you at a discount as it is not a full sheet. Use your imagination, plan your work and work your plan. In all of this protect your windows in this manner, before they break…and avoid those gaping holes after they’re gone. Happy hammering!
JJ