This article was originally posted at Adventures in Self Reliance
Apparently there are a couple of different recipes out there for these, we just used one I had been given by a food storage lady. Now, this was really a fun experiment, because there were 6 of us making these survival bread loaves, and of course they turned out 6 different ways. We’ll discuss what happened as we go through the directions.
Ingredients:
- 2 cups oats
- 2 1/2 cups powdered milk
- 1 cup sugar
- 3 TB honey
- 1 3 oz package jello (orange or lemon)
- 3 TB water
Mix the oats, powdered milk, and sugar together in a bowl: A couple of us used regular oats, a couple used quick oats. I really don’t think it matters which you use–whatever you have on hand is fine.

In a medium pan mix water, jello and honey. Bring to a boil. We found that a rolling boil was better than just beginning to boil for the mixing step. I did not know why the recipe called for lemon or orange jello so we made some with raspberry and watermelon. When we tasted them, we figured the lemon or orange were specified due to the high amount of sugar in this recipe! The sweet jello bars were REALLY sweet when they were done!
One of us also mis-read the instruction email and mixed her jello in with the dry ingredients, so we just boiled water and honey at this step and it gave the final product a slightly different texture, but still worked.
Lemon jello barely boiling:

Raspberry jello at a rolling boil:

Add jello mixture to dry ingredients. Mix well. If the dough is too dry, add a small amount of water a teaspoon at a time. This is where it got a bit tricky. You want this to be dry, but it has to be moist enough to stick together, and this stuff is stiff!!! Spoons only work for about 30 seconds–you’ll end up cleaning your hands and smashing it all together that way (or you could use your mixer, I guess–why didn’t we think to do that???)
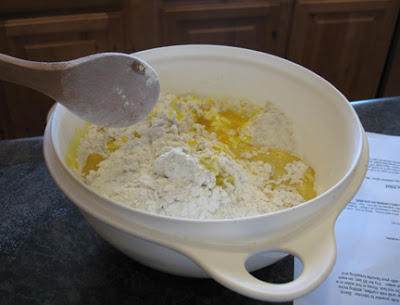
Add the water a little at a time–do NOT get impatient and just add a bunch of water! You’ll be able to stick it together lots easier, but the idea is for it to be dry so it will not mold in your car trunk like your kid’s leftover tuna fish sandwich…

Shape dough into a loaf about the size of a brick.Yeah, right. We had a couple of Martha Stewarts with us that were able to form lovely brick shaped loaves, I just wasn’t one of them. I don’t think it really matters what shape your loaf is–it’s not like you’ll be posting pictures of it on the internet or anything . . . I’m thinking if I do these again, I’m going to make smaller loaves anyway and just have 3 smaller loaves instead of one big loaf. I’m going to need a chisel to be able to eat any of this!

Place on a cookie sheet and bake at 350 degrees for 20 minutes.Another recipe I found says to put it in the oven and dry at low heat. That might be better overall. Our loaves got a bit brown on the bottom and we had severe stickage to the pan (think melting/cooking jello+sugar), so you might spray your pan first. Here’s the loaves after they cooked. Okay, I know, they look just like the loaves before they cooked, but really, I didn’t just go to the other side of the pan and take a picture, these were the cooked loaves.

Cool. Wrap in aluminum foil to store.I do not know why you wouldn’t put it in a ziplock or something, but I guess maybe it stays dryer in the foil. Not sure about you all in humid climates–this probably wouldn’t last in foil–I think I’d maybe make sure it was really dry, then vacuum pack it with my foodsaver if I lived anywhere besides the desert!

This bread will keep indefinitely and each loaf is the daily nutrients for one adult (approx 2000 calories). This is what the paper says. My loaves are going in the back of my suburban when I get my car kit put together and we’ll see how long they last! This was not too difficult to make. I figured the cost of 1/4 of a #10 can of powdered milk at $2.00 (we got the powdered milk at $8/can–lots of places are more expensive than that) the jello at $ .50 (okay, mine was $.97 because I had to buy it at the little store here in town–jello is a non food that I don’t usually have in my food storage), the sugar, honey, and oats another $1.00 or so. So on the cheap end, these cost $3.50ish for 2000 calories, compared to $4.95 for 2400 calories of the commercial emergency food bars. These are larger and heavier than the commercial bars also. I will say however, that the orange jello brick (my personal favorite) actually tasted pretty good and not all processed and shortening (yep, a real word).
So there you have it. Making your own survival food bars from the goods in your food storage! And if you don’t want to eat it you could always use it as a doorstop! 🙂
This article was originally posted at Adventures in Self Reliance
So I’m curious… How well did they hold up??
So far so good! I wrapped them in plastic wrap and then layered them with foil. The website that I found this article on indicated that these bars can last up to a year if stored in the right conditions. When I made these, I made this a family project and let my kids pick what flavor they wanted their survival bars to be, and let them shape the bars and put them in the oven. The kids actually thought they were going to get to eat them after they came out of the oven. Now they can’t for an emergency to happen so they can eat their survival bars! 🙂
Am wondering if any of you ate one yet? I am thinking that such a thick bar would be too hard to bite into after a month or two.
Do you think it would be alright to make them less thick and if so what do you think the baking times would be?
@whitehorse i would assume that you could bake them similar to hard tack, and make them smaller. But then they wouldnt work as a doorstop 😛
IF, and it can be found in some libraries still, you can find a copy of “The Last Whole Earth Catalog” (yes, that old Hippie book;)), there is a recipe in it for survival bars very similiar to this one that get baked in a 9X13 pan. They are as large or small as you want so you can wrap an individual portion in waxed paper, then tin foil. In a cool, dry storage place, they will last at least a year, but I would also vacuum pack them, or at least put them in a rodent and insect proof container to be sure.
I used this for a long hike through Glacier Park as a snack bar for two people. I had figured that it would be a snack or hot oatmeal treat for breakfasts. The original recipe called for orange Jello I think, but I used raspberry for my first batch. My companion ate the entire package of twelve bars in one day! Needless to say, I carried the food pack after that.
My boys managed to polish off every batch ever made if they could find them, and they always did!
Don’t forget to bake them on parchment paper, and you’ll have no problems with them sticking to the pan! Plus you can wrap them first in parchment paper to avoid it sticking to your plastic wrapper…
Just tried my first batch. I also misread the directions and added the jello to the dry ingredients. I also added honey separately, and wound up using about 4.5 tbsp of water to get a crumbly (but form-able) consistency. Turned out surprisingly well. Next time I will READ a little slower 🙂
From the ingredients list, it does not sound like there’s any nutritional value to these whatsoever. Since no values were calculated I’m curious as to where you figured this was good for a day’s worth of nutrition. Sure it has a lot of calories; it’s all sugar!
Hi Debbie,
The oats, powdered milk and honey are the main ingredients and will supply your body with essential carbohydrates and fiber from the oats, calcium and various vitamins from the powdered milk and honey contains natural sugars, minerals and vitamins, and even antioxidant properties.
Another alternative to making survival bars would be to create your own bug out meal plan. This article has some healthy selections as well as a nutrition breakdown.
I would look into adding a protein powder to the recipe, probably as a partial replacement of the milk powder. this would add essential protein needed in a survival situation. The drawback of the protein powder is that it will lose some value from the heat of baking, and in long term storage.
When you’re in an emergency situation, you need high carbohydrates and calories. these may not have the “high nutritional value of a high end energy bar, but they will sustain you in an emergency. I’m thinking that you might be able to also add maybe a few nuts and/or dried fruit to the mixture
I’d consider some alternatives, like forming in a muffin tin to get smaller pieces. Also, using cocunut or coconut milk. I think they don’t recommend wrapping in plastic due to condensation and then the moisture causing spoilage. Therefore, consider a freezer bag,(after tin foil) but add a small (maybe 200cc) oxygen absorber. DarrynL beat me to the protein powder idea.
Anyway, loved this idea/ recipe. Thanks.
I think I would slice into bars, and dehydrate, then wrap in wax paper (for easy portability and quick snacks) and vacuum seal 1 bar per family member in each bag. Or perhaps line a pan with parchment paper and squish the mix flat to be cut into bars after cooking