So, what is a forge, (or furnace, if you prefer)? Just a modified oven that can be defined as an enclosed oven for the express purpose of containing and raising the temperature of the fuels burned. The forge-label usually denotes fabrication, primarily from metals within that fiery furnace. This simple list of materials will give you what you need to build your own forge.
- Steel 5-gallon bucket (cylindrical, akin to contractor-grade)
- 2-3-gallon galvanized bucket
- 20 lbs. of sand or cat litter
- “stand” fashioned out of heavy-gauge wire fencing
- 6-10 bricks or several large bricks/masonry tiles
- Charcoal briquettes (about 20-lbs)
- Hair dryer
- Tongs/long-handled pliers
- Water pan (approx. 1 square foot L, and 3-4” deep)
- Fire extinguisher
- Heavy gloves, and goggles
Why These Materials, J.J.?
With these materials, you’ll be able to make a forge for yourself. Why? So you can fabricate items made of metal, repair things, and obtain heat where a higher heat than just a standard fire is required. The charcoal briquettes enable you to have an even fire that can be super-oxygenated with the aid of the hair dryer. If you want to pick up an old-fashioned bellows, then knock yourself out. Using a hair dryer on the “cold” setting enables you to oxygenate the fire without burning out the hair dryer’s heating element.
The wire stand on the inside of the interior bucket is to enable the briquettes to heat your crucible, which is a container/vessel used to melt materials at high temperatures. You can have a welder fabricate one of these out of steel piping, preferably 5-6 inches in diameter and about 1 foot in length. The bottom of the steel pipe needs to be covered over with about a ¼ inch piece of steel slightly larger than the steel pipe’s diameter and welded to it. This can be done for a reasonable price.
The tongs you’ll need to remove the crucible from when you heat it up, and the goggles and gloves for your own safety. How many times do we throw away old cans and scrap metal? Well, a while back, I did a piece on keeping metal bins for use as salvaging metals. Here’s your chance to use that metal with your forge.
Instructions For Making a Forge
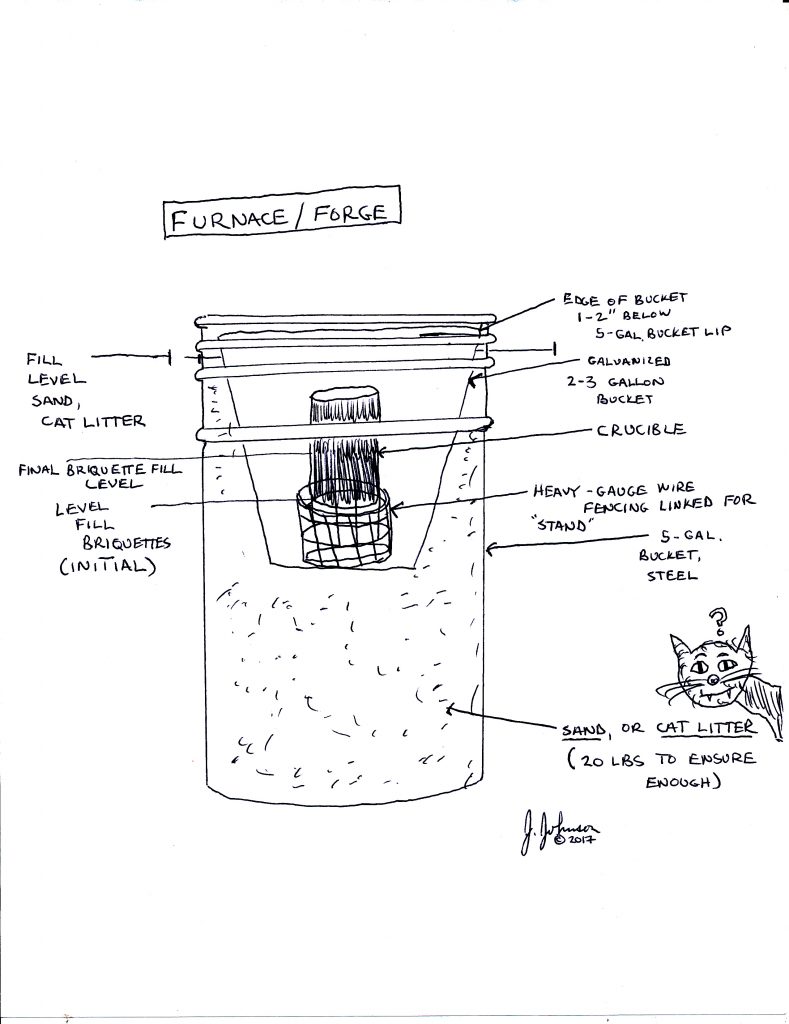
- Set your 5-gallon bucket on the bricks or brick tile, away from flammable surfaces, such as wood. The ground is better. You will want to be close enough to an outlet to plug in the hair dryer.
- Next pour in the sand or litter until the bottom of the galvanized bucket sits firmly on it. You’ll want to make a funnel out of cardboard or paper to fill in around to the top of the bucket with sand/litter if the bucket is angled. If it’s a cylinder, no problem…go up to about ½” from the bucket’s top. Make sure the top of your interior, galvanized bucket is about 1-2” below the 5-gallon bucket’s top lip.
- Construct your heavy-duty wire fencing stand as a rack to hold your crucible within the galvanized bucket. The sand/cat litter insulates the outer vessel from the tremendous heat your forge will produce. You want the crucible off the bottom of the bucket, with space in between it and the charcoal briquettes, for the promotion of airflow, steady burning, and to prevent the crucible from putting out the fire. Your first firing is to get the briquettes up to (but no higher than) the top level of the stand the crucible is sitting on.
- Using the hair dryer on “cool/cold” setting, you can evenly oxygenate the briquettes until they are glowing evenly and hotter than a regular fire. It is going to take time and practice to perfect this.
- Then (being safe) you will manipulate your crucible with the tongs. You can also place a big metal can full of cat litter with a hollow in it to set the crucible to cool, and use the pan of water after it is no longer glowing hot. Be sure to have an updated and serviceable fire extinguisher handy in case the operation is not all going along with your plan.
- Research your metals you wish to melt. Perhaps bars or ingots can be made for later use. You may want to fabricate parts for different tools and machinery. This is beyond the scope of this article; however, remember that a part can be duplicated if you can make an impression of that part in a suitable material to take a pouring. There are plenty of websites and resources out there to pursue an interest in metallurgy if you take the time.
Be safe, and be sure before you attempt any of this. Don’t heat up anything inside of your garage or on your porch, and never in an enclosed area because of carbon monoxide fumes that can kill you. Study and learn as much as you can before operating your forge. Whatever you intend to build, have all your steps written down before you go about building it. Be safe, be professional, and keep in that good fight! JJ out!
One thing that intrigues me is damascus steel, i love the patterns and shapes that can be acheived by beating hot steel,,,
One of the coolest damascus knives i have ever seen was made from old chainsaw chain,
My question is if you you are in a place/situation where you depend on forging… whats going power the blow dryer?
JJ – Excellent article….but you never said what could be used as a crucible or how tomake one.
Without a crucible, your information in this article is useless
Thank you for your brave service, SIR. This is about heating steel, not melting. If you’re making bullets, yeah, you need a container for the lead, but not for making knives, etc. You can use a cast iron pot to melt lead in.
your crucible, which is a container/vessel used to melt materials at high temperatures. You can have a welder fabricate one of these out of steel piping, preferably 5-6 inches in diameter and about 1 foot in length. The bottom of the steel pipe needs to be covered over with about a ¼ inch piece of steel slightly larger than the steel pipe’s diameter and welded to it.
Unless you have access to solar panels or wind turbines, batteries and a DC to AC inverter to power the hair dryer, you’re gonna need a bellows to blow the fire with.