
How are you doing, Ready Nutrition Readers? This article is the final segment of a three-part series dealing with obtaining water in a preparedness and survival stance. We will focus today on home and small group needs for water, incorporating knowledge from the prior two segments to complete the picture. The needs of each home will differ considerably due to varying needs of water consumption. A two-story home with five children, two parents, and an elderly grandparent with a long-term illness, for example, will need a different amount of water than two brothers in their thirties living in a small cottage.
The basics we’ll cover can be tailor-made to fit the situation that governs your needs. Conservatively speaking, each person needs between 1-2 gallons per day for intake; this does not include use of showers, toilet, sink, and laundry. As we covered in part 2 of this series on water, during a survival/grid down scenario, there are a number of diseases that must be taken into consideration. There are filtration and purification methods as detailed in part 1 as well as large-scale considerations. First things first: let’s discuss obtaining water.
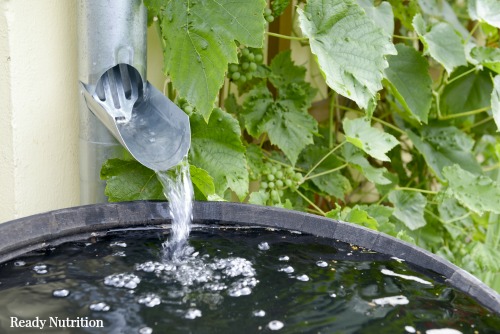
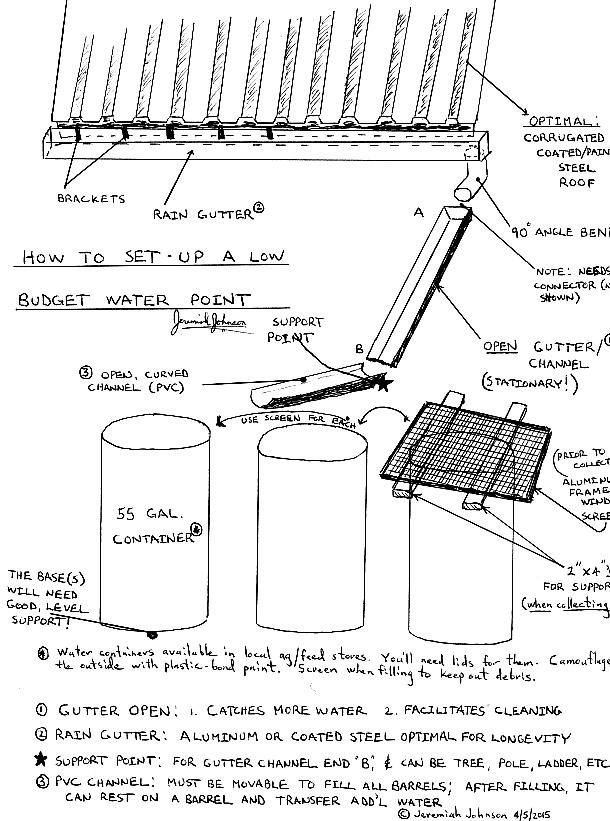
I have included a diagram that shows how to make a water point for the family. Prior to doing any of this, consult with your lawyer or your local and state guidelines concerning laws, statutes, and regulations in the state you live; they may prohibit your obtaining and storing water (surface, rain, or other). Your best bet for catchment is a simple system using the roof. Tar or asphalt roofs are “no-go’s” because of the chemicals that will contaminate your water supply. Slate or tile can be used, and this author believes steel (coated or non-flake-painted) roofs are the way to go.
Your collection barrels can be purchased for $35 – $50 in your local feed or hardware store. Be sure to not pick up a translucent barrel, as your water supply will develop algae; they should be dark in color. I have found some decent 50-gallon barrels that are brown with black lids and a ring-type screw-on seal complete with rubber flange. You want to find a color that camouflages the water barrel or paint it with plastic-bonding paint to make it blend in your environment. If you have a straight roof, you can do at least two collection points. Four (4) 55-gal barrels per point is optimal. Then you’re looking at 440 gallons total when they’re filled.
For those who can afford it and those who don’t have a 6’ (yes, six foot) frost line, there are 225-gallon holding tanks that can be set in-ground, or you can set in a brick and concrete underground cistern. There are plenty of plans and sites available on the web, and (depending on your family’s needs) you may wish to consider them as options. There are other variables that you must consider as well, and some are as follows:
- Time of the year/season: Obviously you’re not going to collect much rainwater in the wintertime. The water point needs to be shut down during the winter to prevent your barrels from freezing, splitting, and/or becoming a giant, fixed, “cool-pack” that weighs around 418 lbs. (a gallon of water is 7.6 lbs). It is best to gather snow and melt it (5 gal snow = 1 gallon water), or pour it into non-splitting containers for big blocks of ice you can melt down.
- Neighbors: How are things on “Sesame Street?” Are the neighbors friendly, or are they just “friends in need” when the time comes, or even worse? Would they complain about your water point(s) to your friendly neighborhood housing authority? Or will they want to take your supply when they have no water? Best advice here is some type of security system around your water point. You may even wish to enclose your barrels in some type of shed or storage building. Camouflage, ad infinitum, in all things you do; blend in and do not stick out.
- Budget: The system I diagrammed is low budget. You can do it (total) for under $300, if you’re sharp and cut corners. You need to spec it out on paper with a good working diagram of your own as applicable to your home.
OK, so we have a good method of collecting water and some suggestions to store it, but what about those “creepy crawlies” from Part 2? Disease during a disaster is going to run rampant. You need to be prepared, and here are some methods to do it.
Microscope: A good microscope is going to be worth its weight in gold. You need one with a mirror-lighting system to augment the stage illuminator, to enable you to use the sun if it’s “grid down” and/or a generator is inconvenient or too noisy. To invest in a decent one, ask your doctor, veterinarian, or a local schoolteacher or professor of biology to make a recommendation. A 100x – 500x should work just fine. You’ll also need a gram-staining kit, slides, test tubes, and a good lab manual with plenty of color photos to identify specimens on a slide. With this you’ll be able to do your own homework and find out what is making your whole family ill. Remember the microscope is not powerful enough to see most viruses; however, you’ll be able to see bacteria and the one-celled buggers of the protista family (ex: Giardia lamblia).
Disinfection Station: This would be wise for when family members fall ill. Station it between the house and the water point. Nobody needs to visit the water point if: 1. They have not been disinfected, or 2. Should they fall ill. There is an awesome product called Medline Micro-kill Bleach Germicidal Bleach Wipes that works on the following: Viruses – Hep B, Hep C, HIV. Bacteria – Staphylococcus aureus MRSA, S. aureus, Enterococcus faecalis, Salmonella enterica. The list is not exhaustive. You must wear gloves when using it, and it’s not cheap. It even kills Clostridium difficile spores. For further information, call 1-800-MEDLINE.
Stock up on hand sanitizer, Hibiclens (Chlorhexidine Gluconate solution 4.0%), and isopropyl alcohol (best is 91% for a 32-oz bottle at Wal-Mart) for hand cleansing. The disinfection station can also be used when going into the house and visiting anyone who is sick in the family (you should disinfect both coming and going).
Sick Room: For family members who have taken ill, you may want to provide a room that keeps them isolated from the rest of the family while they are recovering. All waste and disposable supplies needed to nurse them needs to be rigorously controlled and burned in a burn pit or barrel. This recovery room is best placed on the furthest part of the house. An excellent control measure is the portable potties with sturdy frame, bucket, seat, and lid that you can find in a medical supply store. Brand new they’re around $150, however, if you shop around you can find them now and again in your local thrift stores or flea markets. The buckets take a 4-gal bag. Glove up, tie the bag off, and take it to the burn location.
Now let us discuss a few water conservation measures. We already mentioned the portable potty, and it can be used in times besides sickness to conserve valuable water. In my humble opinion, a family should have two of them. The burn pit/barrel should be situated a minimum of 100 feet away from the house for safety and hygiene purposes. With a grid down event, water will be too scarce to lose in the normal cycle of the flushing toilets. For interior water storage, you will have to decide what you can and cannot do. I recommend at least 10 gallons per person and 5 gallons per domestic animal for starters.
Regarding the rainwater catchment system, any water consumed directly should still be boiled or filtered. This prevents you from having any contaminant such as bird droppings from giving you a bad day. I strongly recommend the Big Berkey water filtration system by New Millenium Concepts, Ltd. It is akin to an urn with 2 filters that handle 2 gallons at a time for a filter life of approximately 6,000 gallons for heavy metals, viruses, bacteria, chemicals, and toxins.
Your laundry, bathing, and dishwater in a grid-down event can be re-filtered and boiled to use once again as utility (not drinking) water. The CDC has some good information on such usage on their website; you may also wish to check with your local water board/municipality for further information particular to the water of your area. Once again, this article does not intend nor make claim to treat, diagnose, prescribe, or assess any of the information presented. The materials presented are for informational purposes only. Consult with your licensed, certified family physician, as well as your lawyer and/or your local and state laws or guidelines prior to taking any action using the information in this article. Hope you enjoyed the series and I’m lifting my water bottle and toasting to your health, Ready Nutrition Readers! Have a great day!
Jeremiah Johnson
Water point and Rain Catchment System
This article was originally published at Ready Nutrition™ on April 6th, 2015


Most of the contaminants to roof catchment systems is pollution deposited on the roof over time (traffic, birds, etc.). If you capture all of the rain water from a single event, you will get all of the nasty pollution in your water. A best practice solution is to dump the initial rain water from an event and only capture water after the pollutants are washed away. You can use gutters to bypasses the catchment system until a container fills which then closes the bypass and you collect the cleaner water. State of Texas actually published a study on this.
I live in the desert where water comes either fast and furious or not at all, so gutters are pretty much useless. Is their a good way to attach the barrels to one another, since one barrel will initially collect all the water from each roof, but will overflow in a matter of minutes? Are pvc plumbing fittings the best way to go?
You just need bigger gutters! 5″ gutters with downspouts every 20′ if rain deluges. Yes, you can connect multiple 55 gallon drums using schedule 40 PVC but use 3″ or larger due to rain deluges.
Pex might be better if it gets cold enough.
Gutters aren’t useless they just don’t catch enough of what you think they should.
Of course, in some states, like Utah, such systems are illegal. The rain belongs to the state and is managed as a natural resource. No joke.
Best way I figured or thought in my head, was/is to either make a system that’s in its own room, i.e. Garage, basement (for those who have basements)….some place where your water is or will be secure and out of sight from prying eyes….friendly or not….no one needs to know, except you and immediate family (if there is such)
Well, in my area, the only time to catch water is in the winter; late fall and early spring. It doesn’t rain in the summer, ever. Mediterranean climate. We do average about 49-52 inches a year. Unfortunately, I have a composite roof, so contaminants prevent me from collecting rainwater.