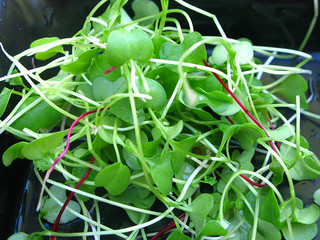
Chances are, you’ve seen tiny, pretty little greens in your salads or as a garnish perched on top of your meal at a restaurant.
Maybe you’ve never given much thought to the delicate little plants before, aside from noticing their increasing prevalence in dining establishments, salad bars, and grocery stores.
But don’t let the size of these petite vegetable greens deceive you – their miniature parts hold a surprising amount of nutrients.
These tiny forms of young edible greens produced from vegetable, herb or other plants are called microgreens.
From Fresh Origins:
Microgreens range in size from one to one and a half inches long, including the stem and leaves. A microgreen has a single central stem which has been cut just above the soil line during harvesting. It has two fully developed cotyledon leaves and usually one pair very small, partially developed true leaves. The typical stem and leaf configuration for micro greens is about 1” to 1½” in height, and ½” to 1“ in width across the top.
Microgreens can have surprisingly intense flavors considering their small size, though not as strong as mature greens and herbs.
The seeds used to grow microgreens are the same seeds that are used for full sized herbs, vegetables and greens. Microgreens are simply seedlings that are harvested before they develop into larger plants. Crops that germinate easily and grow quickly are good candidates for growing as microgreens.
Don’t confuse microgreens with sprouts – they are not the same thing. Sprouts are seeds germinated in water just long enough (usually 48 hours) to grow roots, a stem and pale, underdeveloped leaves. Microgreens, on the other hand, need soil and sunlight and at least 7 days to grow before you can harvest them.
Commonly grown varieties of microgreens include amaranth, arugula, beets, basil, cabbage, celery, chard, chervil, cilantro, cress, fennel, kale, mustard, parsley, radish, and sorrel.
They have been gaining popularity since the 1990s, and an increasing number of varieties are being produced.
In 2012, a team of Agricultural Research Service scientists and colleagues published several studies that shed light on microgreens’ nutritional benefits. Plant physiologist Gene Lester led a team who analyzed the key nutrients in 25 commercially available varieties of microgreens. Key nutrients measured were ascorbic acid (vitamin C), tocopherols (vitamin E), phylloquinone (vitamin K), and beta-carotene (a vitamin A precursor), plus other related carotenoids in the plants.
Here is a summary of the findings, from USDA.gov:
The team showed that different microgreens contained widely differing amounts of vitamins and carotenoids. Total vitamin C content ranged from 20 to 147 milligrams (mg) per 100 grams of cotyledon fresh weight, depending on which plant species was being tested. The amounts of the carotenoids beta-carotene, lutein/zeaxanthin, and violaxanthin ranged from about 0.6 mg to 12.1 mg per 100 grams of fresh weight. For comparison, an average apple weighs 100-150 grams
Among the 25 microgreens tested, red cabbage, cilantro, garnet amaranth, and green daikon radish had the highest concentrations of vitamin C, carotenoids, vitamin K, and vitamin E, respectively.
In general, microgreens contained considerably higher levels of vitamins and carotenoids—about five times greater—than their mature plant counterparts, an indication that microgreens may be worth the trouble of delivering them fresh during their short lives.
Buckwheat “seeds”, which look like cereal grains, can be classified as a microgreen because they are actually dry, hard-covered fruits called “achenes.” Each achene contains one small seed – seeds which bear cotyledons during germination. Buckwheat is a good protein source and is gluten-free, and are high in antioxidants, flavonoids, carotenoids, and alpha-tocopherol.
You can grow your own microgreens indoors with these instructions from Organic Gardening:
Getting Started
Select a shallow plastic container with drainage holes, such as a nursery flat or prepackaged-salad box (either clear or opaque plastic boxes work). Fill the container with 11/2 to 2 inches of moistened organic potting mix. Cut a piece of cardboard to fit inside the container. Gently press the cardboard onto the soil to create a flat, even surface.Microgreen Seeds
Mesclun seed mixes are a good choice for microgreens. Single-crop microgreens also work. Scatter the seeds over the soil surface, then place the cardboard over the seeds and lightly press them into the soil.Potting Mix
Using a coarse wire-mesh sieve, sift a very fine (1/8-inch) layer of dry potting mix over the seeds. Set the container onto a drip tray and then carefully water the seeds in with a gentle shower from a watering can. Place the tray on a sunny, south-facing windowsill or under grow lights. Expect the seeds to germinate in 3 to 7 days.Harvesting Microgreens
Keep the soil consistently moist. Prevent soggy soil by pouring off any excess water that collects in the drip tray after watering. To harvest, snip the microgreens right above the soil line when their first true leaves unfurl (about 7 to 14 days after germination, depending on the green).
Use your microgreens as a garnish for almost any dish, or as an addition to sandwiches, soups, and salads. They add nutrients, flavor, and texture to any meal.
This article was originally published at Ready Nutrition™ on September 19th, 2014


